Headless WordPress SEO with Yoast & GraphQL

Yoast is a Search Engine Optimization (SEO) software company that is well known to just about everybody who practices SEO. Their WordPress plugin is one of the most popular WordPress plugins of all time, and is used on millions of websites to easily update meta information, automate structured data, and help content managers optimize their content for search engines.
This article assumes that you have a working knowledge of WordPress, as well as Yoast and its features, and is geared toward those who want to understand how to use Yoast to power features for headless WordPress sites.
Why Choose Yoast for Headless WordPress SEO?
Yoast was early to market with their SEO plugin for WordPress, launching the first version of what would become Yoast SEO for WordPress in 2010.By now it’s true that there are other options for plugins that provide similar functionality, but Yoast’s ever-growing and continually-improving ecosystem still makes it an excellent choice for working with headless WordPress. It is easy to set up and get started, as you will see in this article.
I am going to use my portfolio website, on which you are reading this post, to demonstrate how to set up Yoast for headless WordPress SEO. At the time of this writing this site is built with Gatsby, so this guide will directly demonstrate how to use Yoast SEO with Gatsby and WordPress, but these concepts are easily translated to other React frameworks.
Setting Up Yoast with WPGraphQL
There are a handful of plugins that make it easy to pull the data you need from WordPress straight into your decoupled front end:
- WPGraphQL – Created and maintained by Jason Bahl of WPEngine, WPGraphQL is the most important plugin for headless WordPress developers. It creates a GraphQL endpoint for your headless WordPress installation that you are able to query using GraphQL from your front end to access your content and inject it into your site. It provides a number of optimizations that make it a better choice than using the WordPress REST API for building headless WordPress websites.
- Yoast SEO – As discussed above, Yoast’s SEO plugin for WordPress provides us with tools that we can access in our posts and pages to easily manage certain functionality that is important for SEO purposes, including Title Tags, Meta Descriptions, canonical URLs, and structured data. Yoast offers a premium (paid) plugin, but all of the features we will use here are available in the free version.
- WPGraphQL Yoast SEO Addon – This plugin, created by Ash Hitchcock, maps the data provided by Yoast to WPGraphQL and adds an ‘seo’ field to the pages and posts in our WPGraphQL instance where we can query for the data managed by Yoast with WPGraphQL.

Managing Title Tags & Meta Descriptions with Yoast
The primary purpose of using WordPress headlessly to power a website is so that content managers, marketers, or small business owners are able to have complete control over the content on a website, while the web developer can focus on building a performant front end where that data is displayed to users quickly and beautifully. It’s easy to use custom post types with headless WordPress for increased flexibility. For this reason, we often want to move as much of the content as possible into WordPress rather than our front end code, especially if it is important for SEO.
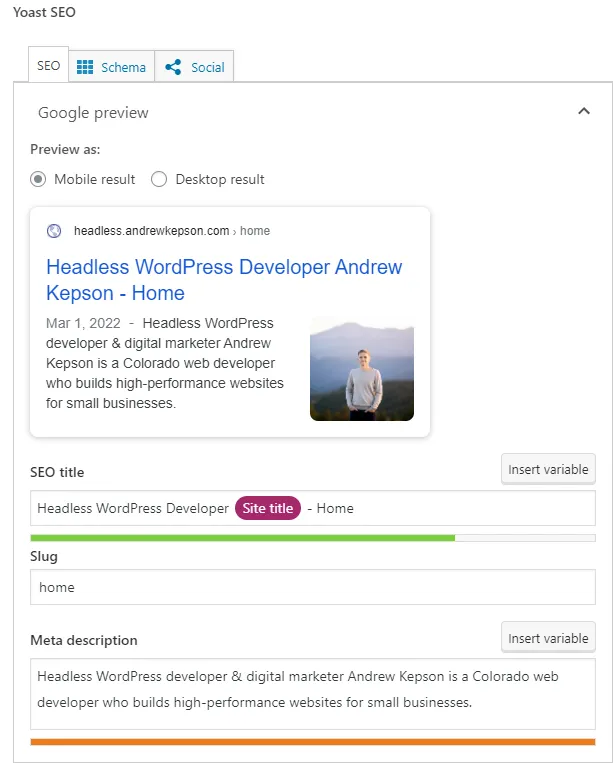
In order to move the Title tags & meta descriptions for my site’s pages into WordPress, I’ve created a “Home” page in WordPress. With Yoast installed, I’m provided with a widget where I can edit the page’s Title tag & meta description:
Canonical URLs with Yoast & GraphQL
We can also manage canonical URLs with Yoast. Check out Yoast’s ultimate guide to canonical URLs if you want to learn more about these. Essentially, they let us signal to search engines which version of a page we want to be indexed, which is helpful for resolving duplicate content issues, or to clarify which version of an article is authoritative if it is going to be posted in multiple places. For example, a few of my blog posts are also published on Medium, but I have set up canonical URL tags to signal that I want the version on my website to be the one that is shown to users in search engines.
Note: Some might ask why I am not using gatsby-plugin-canonical-urls; the reason is because it has a tendency to present some counterproductive behavior as outlined in Monica Lent’s article, How to Uncover Non-obvious SEO Mistakes on Gatsby Websites.
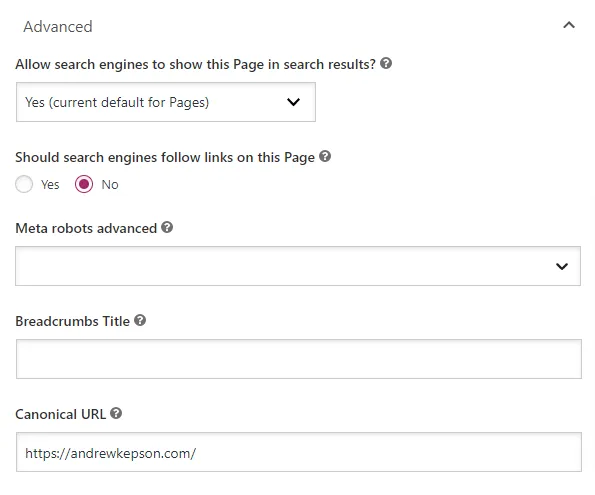
In the Advanced tab of the Yoast SEO widget in WordPress, we can set up the canonical URL for any page:
Integrating Yoast with Gatsby’s SEO Component
Gatsby provides a great SEO component out of the box that is included with their starters. Built with React helmet, we can import it to our page component and pass our page’s Title, meta description, and canonical URL as props where they will be injected into the appropriate HTML tags when the site is built. If you are using Next.js, you could accomplish the same thing by passing the data to your Next/head component. You can set your component up to accept your canonical URL by adding a canonical prop to the SEO component and conditionally rendering rel=”canonical” HTML tags inside of it:

Querying Yoast with GraphQL from Our Front End
Now that we have added our data with Yoast, we expect to be able to find it with WPGraphQL. The WPGraphQL Yoast Addon creates an “seo” field in our GraphQL schema. You can see this in action by looking in the GraphiQL IDE provided in WordPress, but since we are using Gatsby we will build it with the IDE that Gatsby provides. Gatsby is actually querying a cached version of our WordPress data, and it slightly alters the schema provided by WPGraphQL.
Building Our GraphQL Query for Yoast
There are three things we want to get from the Home page: the Title, meta description, and the canonical URL. We can build this query out in Gatsby’s GraphiQL IDE found in development mode at localhost:8000/__graphql:
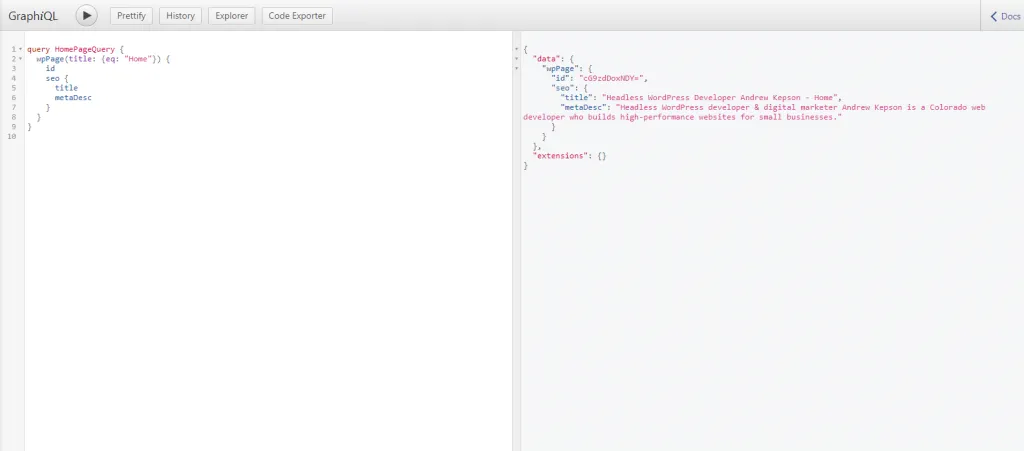
Notice that in our query we are filtering for the page title in WordPress that matches the content for our page component – in this case, “Home.”
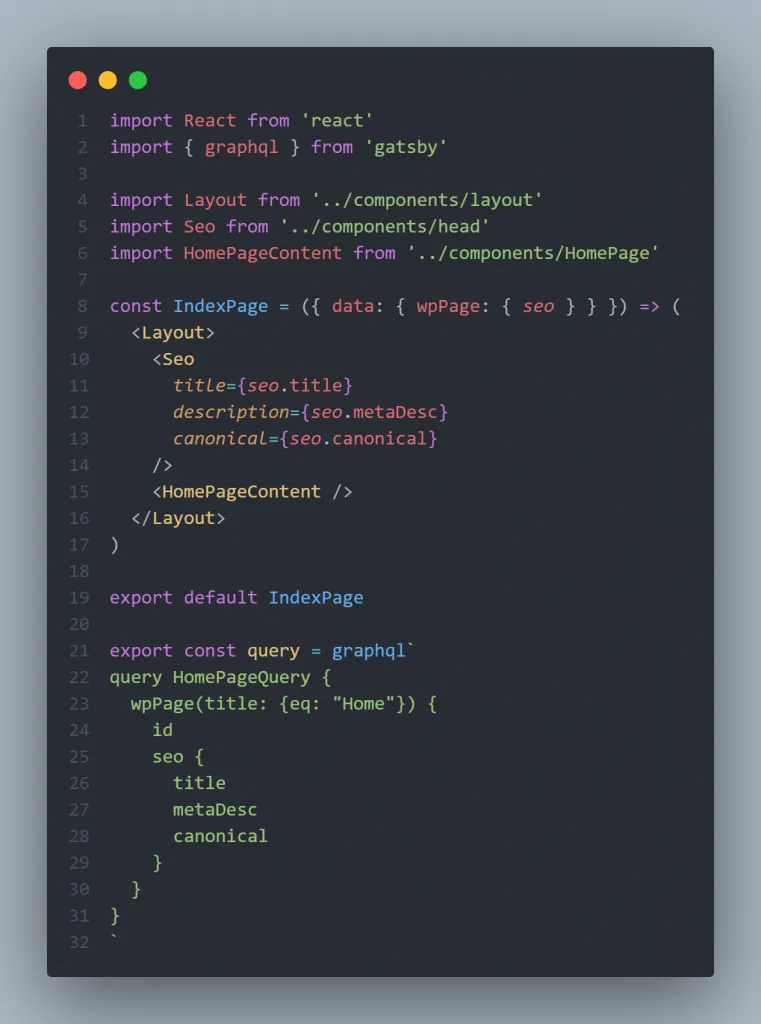
In Gatsby, components that are exported from the src/pages/ directory are created as static pages when the site is built, so we need to use this query in the file src/pages/index.js. In each of these files we can export a graphql query and then access the data from a destructured data prop in our page component.
At build time the data is queried, and anything we use from our data prop is injected into our template – tying together our headless WordPress back end and the React component we are using on the front end. To make this work, we need to import GraphQL from Gatsby. Everything comes together in our final page component:
Managing Schema with Yoast & GraphQL
Yoast can also generate structured data schema for our WordPress pages, and we can query those as well and inject them into our SEO component.
First, we need to prepare our SEO component to accept the schema prop and conditionally render it as with the canonical URL:

Then we can add it to our query and pass it in our page component:
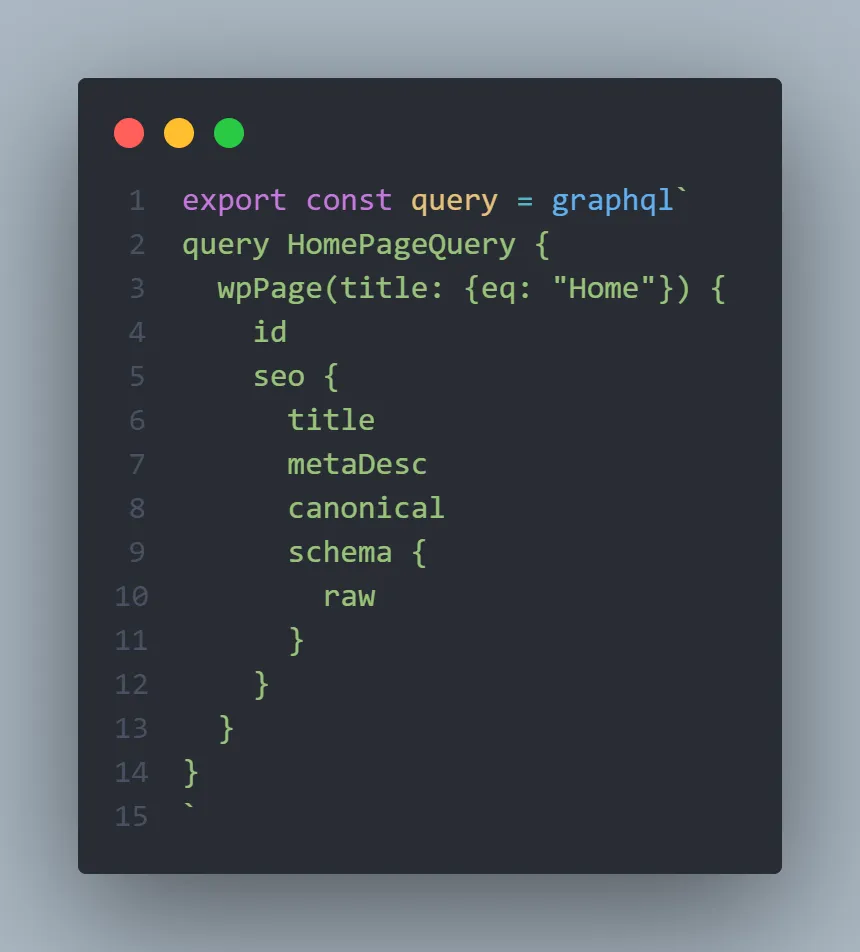
Personally, I don’t use Yoast to manage structured data, nor do I recommend it for those who have the capability to write and implement custom structured data – but having any structured data is better than having none, even if it is not fully optimized.
Headless WordPress SEO with Yoast & GraphQL: Final Thoughts
As one of the most popular plugins of all time used to manage SEO data for countless websites, it is essential for a headless WordPress developer to be familiar with Yoast since it is likely that many projects will already be using it, and it is a great option for new sites as well.
As websites become increasingly complex in order to meet the demands required for site performance as well as content management, it is essential that the solutions we build rise to the challenge and provide every member of the team the tools they need to excel.
Share this post
Stay in the Conversation
Thoughtful essays on web development, SEO, and automation — sent occasionally, never spammed.
Related Posts
- Astro vs. WordPress: Rendering Patterns of the Modern Web
- Shattering Headless WordPress Build Times with Astro’s Content Layer API
- Custom Post Types for Headless WordPress with Atlas Content Modeler
- Building a Headless WordPress Site with Node & GraphQL
- Creating Our Own Headless WordPress Source with Gatsby & the WordPress API